This post is adapted from an article by Jamie which appeared in “Plastic Warrior” magazine.

Learn how to create a bow-wielding Napoleonic Rifleman
Until 1980, I was playing H.G. Wells’s ‘Little Wars’-type war games with armies of hundreds of soldiers moving and “firing” at each other across my living room floor. Then I began a new type of game with my friend, comedian John Monteith. This game was more in the tradition of Donald Featherstone’s ‘Skirmish Wargaming’ or ‘Dungeons and Dragons,’ where each soldier would move, fire and take other actions individually. (You’ll find many posts here about my game, which is called ‘Harold’s Rangers.’)
‘Harold’s Rangers’ was, at first, played with a single pose of a figure to represent each man in a squad-sized military unit. Then it evolved into a game where we used the same rules, but created characters with names to make it more interesting. Soon thereafter we decided to have each of these named characters represented not by just a single, off the shelf figure, but by a variety of poses, each painted to be the same person.
As Monty and I played games with these characters, I began photographing the action with 35mm slide film. During the very first slide show that was held to “play back” the game just conducted, the last and final evolution of the figures was suggested: if each character could be “animated” (remade into new and different poses) the slide show would actually be like an after-action report of a war game. Each character could be re-made to perform actions which we had hitherto only imagined, as the off-the-shelf pose selection for most figures was extremely limited. Soon we had our characters firing two pistols, dueling with a variety of weapons, throwing grappling irons, and even skiing or climbing a cliff with full back pack. As a result of this animation of our characters, the slide show felt like we were watching a movie of our game.
The original experiments in animation, conducted in Monty’s living room and kitchen, were the first of over 3,000 animated figures I have made for myself, and of over 15,000 my company has produced for customers in the past two decades.
In order to animate toy soldiers, we take existing figures, then cut off and re-attach hands, heads, arms, legs and other parts to create entirely new models which fit right in with other soldiers of the same era. It’s an easy way to increase the number of poses you have in a given era.
In this article I will share my production methods so you can make your own figures.
Some Advice to Start
All but the most skilled animators will have to face the fact that when they start making figures the resulting models will look like people who survived a poorly-handled hanging, or worse. For this reason, I suggest using figures you consider expendable until such time as you have mastered this method.
NOTE: Extreme care should be taken to avoid injury when cutting up and fusing together plastic figures. We strongly urge parents not to allow children to attempt this work.
Tools

- A set of 2-3 X-Acto craft knives of varying sizes, shapes and strengths. During the preparation phase the finer, smaller blades can carve off a scabbard, arrow quiver, haversack or other small item you want to attach to your figure. Then, when the figure is complete they can be used to carve off little bits of plastic which may be left over after the fusing process. Bigger blades can be used to cut off successively larger body parts, from heads and arms to trunks which need to be separated at the waist.
- 2-4 carbon steel kitchen knives of varying lengths and widths, with rivetted wooden handles. Heated in the flame of your stove, these will hold differing amounts of heat when they are removed and used for fusing. The smallest type of knife we suggest is a “boning” knife, about 9.5 inches long, with a 5 inch long blade that tapers from .75 inches wide at the haft to 3/8 wide at the tip. We use this for attaching heads and small body parts. The next type of knife we suggest is about 10 inches long, but its blade is considerably bigger, measuring 5.5 inchs long blade and tapering from 1 inch wide at the haft to 7/8 wide at the tip. We use this for attaching larger body parts.
- An Opti-Visor allows hands-free closeup work during assembly and cleanup.
Imagining the final product
What do you want to make? A Viking rower for your long ship? A 7th Cavalryman falling backwards off a charging horse? Whatever (or whoever) you choose, this is the time to visualize the end result. For this article, I am making a figure of Bernard Cornwell’s Napoleonic British rifle officer, Richard Sharpe, firing a bow. In the books he is a rifleman, but as the bow fires faster and can be used in a greater variety of situations, I have decided to re-arm my hero to make him more useful in Harold Rangers.
Choosing the appropriate parts

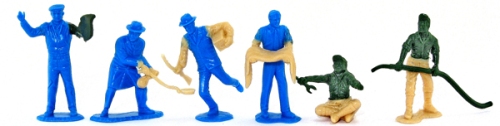
You need to select the figures from which you will cut the bits and pieces to make the finished product. We have selected (pictured above left to right) the Airfix British Infantryman at the ready for the body and head, the Airfix Medieval Archer for the bow arms and quiver, and the Accurate Bewigged Militiaman from set #2 to use his musket as a backup in case our hero runs out of arrows. This is a fairly advanced conversion. We suggest you start with simple projects like switching the head of 2 Accurate Civil War figures.
Cutting the pieces apart

While preheating the kitchen knives on your stove top, cut up the figures you have assembled and set aside the unused bits. We suggest starting a parts box in an old fishing tackle box, in which you can separately store arms, legs, heads and other parts, as well as figures which have been “pruned.”

Loose assembly of pieces
Take the bits you have cut up and place them on your work surface. Do the pieces look like they will fuse together in the way you imagined? Now is the time to rethink the figure, if necessary. If you decide to go forward, this is also the time to figure where you want the pieces to go. We wanted our archer to be sighting along the arrow prior to firing, and to add the musket and quiver in such a way that they would “look” right against his body, and add dimensionality to the pose. One of the greatest appeals of making your own figures is the freedom to add bits and pieces which stand away from the model’s body, something manufacturers are all-too wary of, as such luxuries add to the size of the mold, and thus, to the cost of the figure.
Fusing the parts
Now we come to the focus of this article. The key to this process is to be speedy yet careful. Have the pieces to be assembled laid out near your stove top. Have a clear idea of which piece will attach to which, bearing in mind that some pieces may have to be attached before others so that you will not take the risk of melting one piece that’s already been attached while trying at attach another.
As we are attaching the arms and bow piece to the body first, we will use a thin-bladed boning knife (see above). This will be sufficient to slightly melt the plastic on the arms, but not so hot as to ruin it. Take the knife out of the fire and balance it so the handle is on the stove top and the blade it hanging out in mid-air. Holding the body in one hand, touch it to the bottom of the blade. Touch the arm/bow piece to the top of the blade. 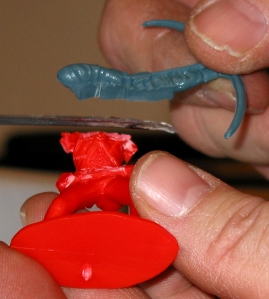 Count to one. As the knife is so hot, this will be all it takes to melt the plastic slightly.

As soon as you see the plastic turning liquid, pull the pieces off the blade and push them together.

They will fuse instantly. After 5-10 seconds, you may “flick” the pieces where they met to see if the join held. If it didn’t, try again. One problem you may face is that not all kinds of plastic will fuse to others. Britains and other PVC type plastics, for instance, will not adhere to Accurate. Experience is the only answer to knowing what will work with what.
Continue with the additional pieces. I attached the head, then the legs, then the base, scabbard and quiver.
Finishing the figure

When you are finished with the basic figure, there is one other step to take. This is the finishing stage. Taking your thinnest knife out of the fire and blend in, smooth out or slice off any bits that look wrong. There will be what I call “squash flash” wherever 2 melted bits came together. On a part of the body covered by clothing, this is the easiest part to fix. Just blend the plastic in, making a fold in the cloth. On parts of the body which are supposed to be skin, use your X-acto knife to cleanly slice the plastic away to the proper shape at neck, wrist or arm. If this seems too much to ask, you can shape the flash around a neck into a scarf, around the waist into a sash, and so forth.
When you are finished with the figure, you may want to add other still more details to enhance it. These can include additional pieces of equipment,such as a sword and scabbard or more exotic attachments. In the case of a female archer I recently made, I took a bit of molten plastic, melted on a knife tip, and attached it to her head, then carved and melted it into a hair fall.
Painting
I never pay much attention to the colors of the plastic I am fusing together, as I generally paint all my soldiers. But you can certainly stick to like colors or complementary ones if you intend to play with your figures unpainted.
Conclusion
That’s about it. All that’s left to say is that you should be sure to work in a well-ventilated area to avoid choking on plastic fumes. I try to place a fan in my kitchen doorway and blow the fumes away from where I’m working towards an open kitchen window. My wife hates the fumes at mealtime, so I also tend to make figures after breakfast on weekends, or when no one’s going to need the kitchen for a couple of hours so I can air it out when I’m done. I can make about 10 figures per hour when I’m rolling, and have made as many as 80 in a day when I’m really pushing myself.
Further examples
If you’d like to see other examples of this process, our website is full of pictures of hand-animated figures, as we also offer them for sale. They’re all listed under the Maker ‘Animated Figures by TSC’, which you will find listed under Plastic Figures on The Toy Soldier Company Search by Maker page.
Here are some quick links. Click on the picture to go directly to the listing on our website.

TSA012 Texan Defenders Firing Down from Walls

TSA019 Mexicans Scaling Ladder Attack

TSA026 Marx CSA Firing Pose
TSA180 Untouchables-Era Civilians and Gangsters and Feds

TSA219ap WWII Marx Japanese Artillerymen – Fully Painted